A Guide to Siting and Installing Air Sensors
On this page:
- Where in My Community Should I Place a Sensor?
- Outdoor Sampling Considerations
- Top Five Considerations for Installing Outdoor Air Sensors
- Evaluating Your Outdoor Sampling Site
- Outdoor Collocation with Regulatory Monitors
- Indoor Sampling Considerations
- Documenting Your Installation
- Related Links
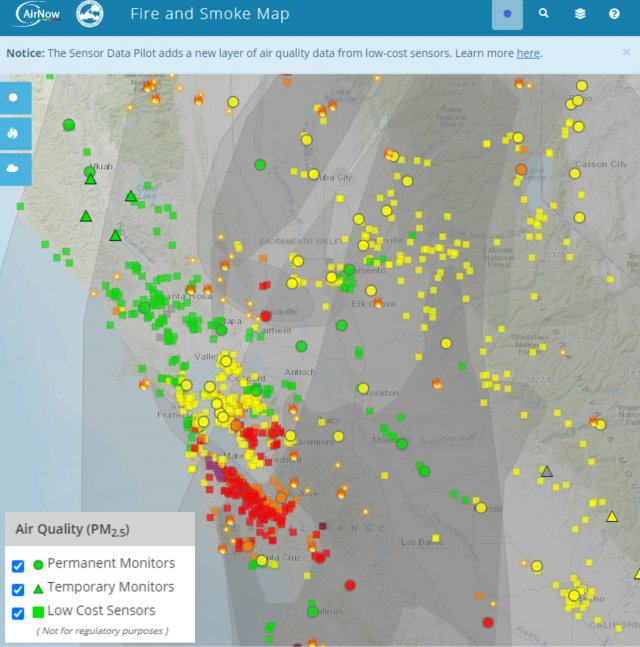
The availability of small, lower-cost, and more portable air sensors is an exciting development for individuals and organizations interested in measuring local air quality. As a result, outdoor and indoor air sensor use has become widespread by local air quality agencies and the public in areas where air pollution episodes, like wildfires, are common.
Selecting the right sensor for your needs is often the first hurdle and consideration. But, did you know that finding an appropriate place to site and install that sensor is also important? Indeed, where you place a sensor can impact the usefulness of the data. The Figure below briefly mentions some of the key logistical considerations and recommendations for determining where a sensor should be placed.
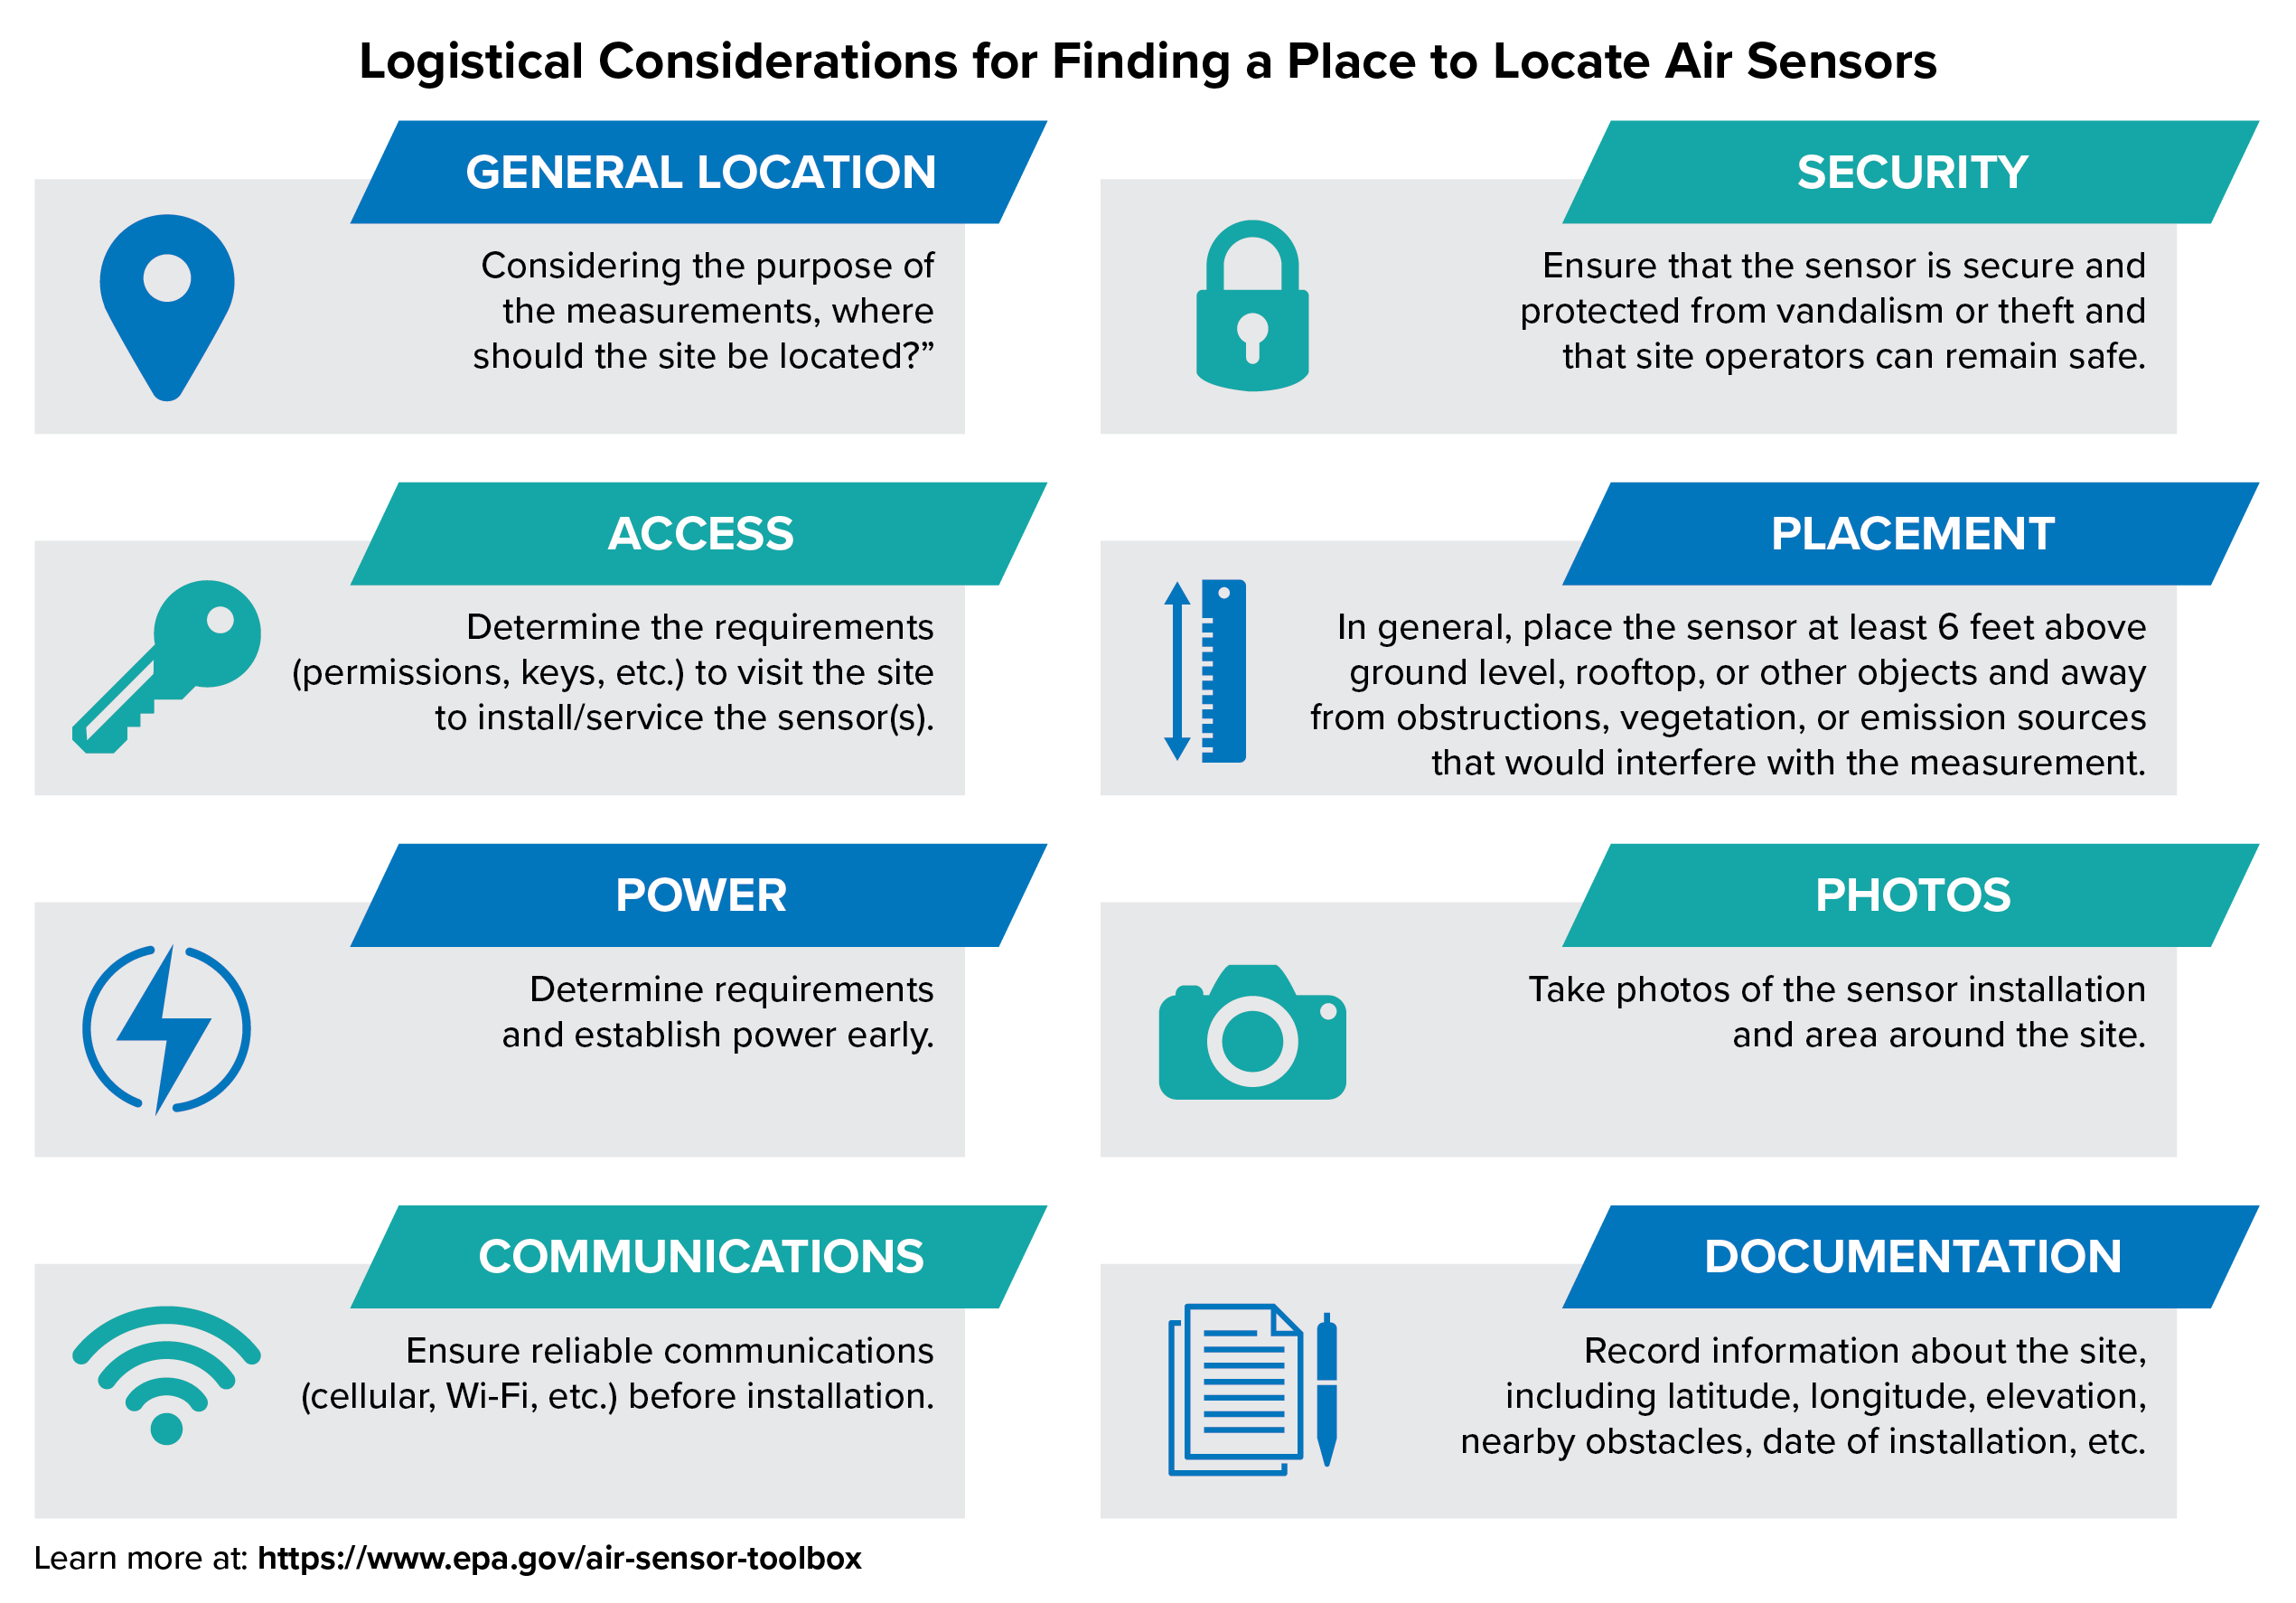
Location: Before setting up a sensor, it is useful to consider your monitoring goals since they can impact your ideal location selection. For example, a sensor that will be used to monitor for emissions from idling buses may be setup in a different location than one used to estimate the local ambient air quality index (AQI). Further recommendations and considerations are discussed in the "Outdoor Sampling Location Considerations" section below.
Access: Although easy to use, air sensors are generally not something you can “set and forget.” You will want to access your site to install and periodically check on the sensor. If you do not control the site, you will want to determine permissions, access requirements, and any limitations on access frequency or timing during the planning stage. Some users have found formal access agreements helpful in explicitly laying out these conditions.
Power: Air sensors may need to be plugged-in, may have solar panels, or may offer both options. Some sensors that offer power options may operate differently depending on which option is used (e.g., the data reporting frequency may change). Be sure to consult the sensor manufacturer to understand the implications. It can be expensive and time consuming to deliver power to a location that does not have the existing infrastructure. Extension cords may be needed for optimal sensor placement. Solar panels may not be adequate if your location does not get enough sun and they will need periodic maintenance to remove dust. Areas that experience public safety power shutoffs may benefit from solar power to prevent monitoring interruptions.
Communications: Sensors may communicate data to a cloud-based interface using a variety of technologies (e.g., cellular, WiFi, LoRa). Some may offer just one option, while other sensors may provide multiple options. Be sure to consult the manufacturer to understand specific requirements such as network limitations (e.g., 2G, 5G), carrier limitations (e.g., Verizon, AT&T), area coverage (U.S. and international), and signal strength needs. If supplying your own mobile hotspot, you may also want to know the typical data use and if the sensor settings can be adjusted to reduce data use.
Security: Sensors and their peripheral equipment (such as solar panels) are subject to tampering and theft. Users will want to consider placing sensors in secure locations. Ideas include mounting a sensor overhead out of arms reach, in an inconspicuous location, or behind a locked gate or fence. When considering secure locations, keep in mind that sensors need a free flow of air, and consider your physical safety when visiting the area or even while climbing a ladder or stepstool for installation or maintenance.
Placement: It is ideal to place sensors near the typical breathing zone height (3 – 6 ft). Sensors should be placed away from pollutant sources (e.g., fire pit or grill) or pollution sinks (e.g., tree or shrub barrier) to get a more representative measure of air quality. Sensors should also be located to allow for free air flow to the sensor. Avoid placement near high voltage power lines, which may create electronic interferences. The outdoor placement guidelines section below provides more detail.
The rest of this page provides information on key considerations to make for sensor placement in both indoor and outdoor locations; guidelines for where to place an air sensor; and some suggestions for how to evaluate the data collected to verify that the sensor placement is ideal. The last section expands on documenting your sensor placement with photos and notes.
Where in My Community Should I Place a Sensor?
You may wonder: Where should I place a sensor in my community? There are numerous options – it could be the local school, park, athletic field, a home, industrial area, bus or ferry terminal, etc. How should you choose where to place a sensor? There are a number of considerations that all stem from one key question: What do I want to learn about air quality from this sensor? Some examples of specific questions are:
- Is the air quality cleaner at school or home?
- How does the air quality at one park compare to another?
- Do idling trucks impact air quality in my neighborhood?
- How does my woodstove impact my indoor air quality?
- What is the Air Quality Index in my community?
For example, let’s take a look at the last question above, “What is the Air Quality Index in my Community?”
You may want to know what the air quality is in your community and how that might impact your health and how this might influence which health protective actions you take. In this case, you would want to select a site that is representative of the area you wish to measure, for example, your community or neighborhood.
A sensor used for this application should not be placed in an area near a very localized source like a barbecue grill or smoking station that will impact only a small area intermittently. Rather, a sensor should be in an area that is exposed to air from many directions to capture the influence of many possible pollutant sources. However, the site also needs to have the necessary infrastructure to operate the sensor or you need to be prepared to provide your own power, connectivity (WiFi or cellular for communication of data), mounting equipment, and security.
Outdoor Sampling Considerations
Once you have selected a location in your community to site your sensor, your next question might be: “How should an air sensor be set up to obtain accurate and representative measurements here?”
EPA has well-established regulatory guidelines for the siting of outdoor ambient air quality monitors. These siting criteria are based on the sampling goals and known interferences. In the case of the ambient monitoring networks, EPA wants to capture an air quality sample representative of the area and the population’s exposure while avoiding things like buildings or trees, which can influence the movement of air and prevent pollution from being sampled by the instruments. The criteria are also designed to prevent sampling of hyperlocal sources like dusty roads, which may influence a particular location or small area but is not representative of the entire area the measurement is meant to represent.
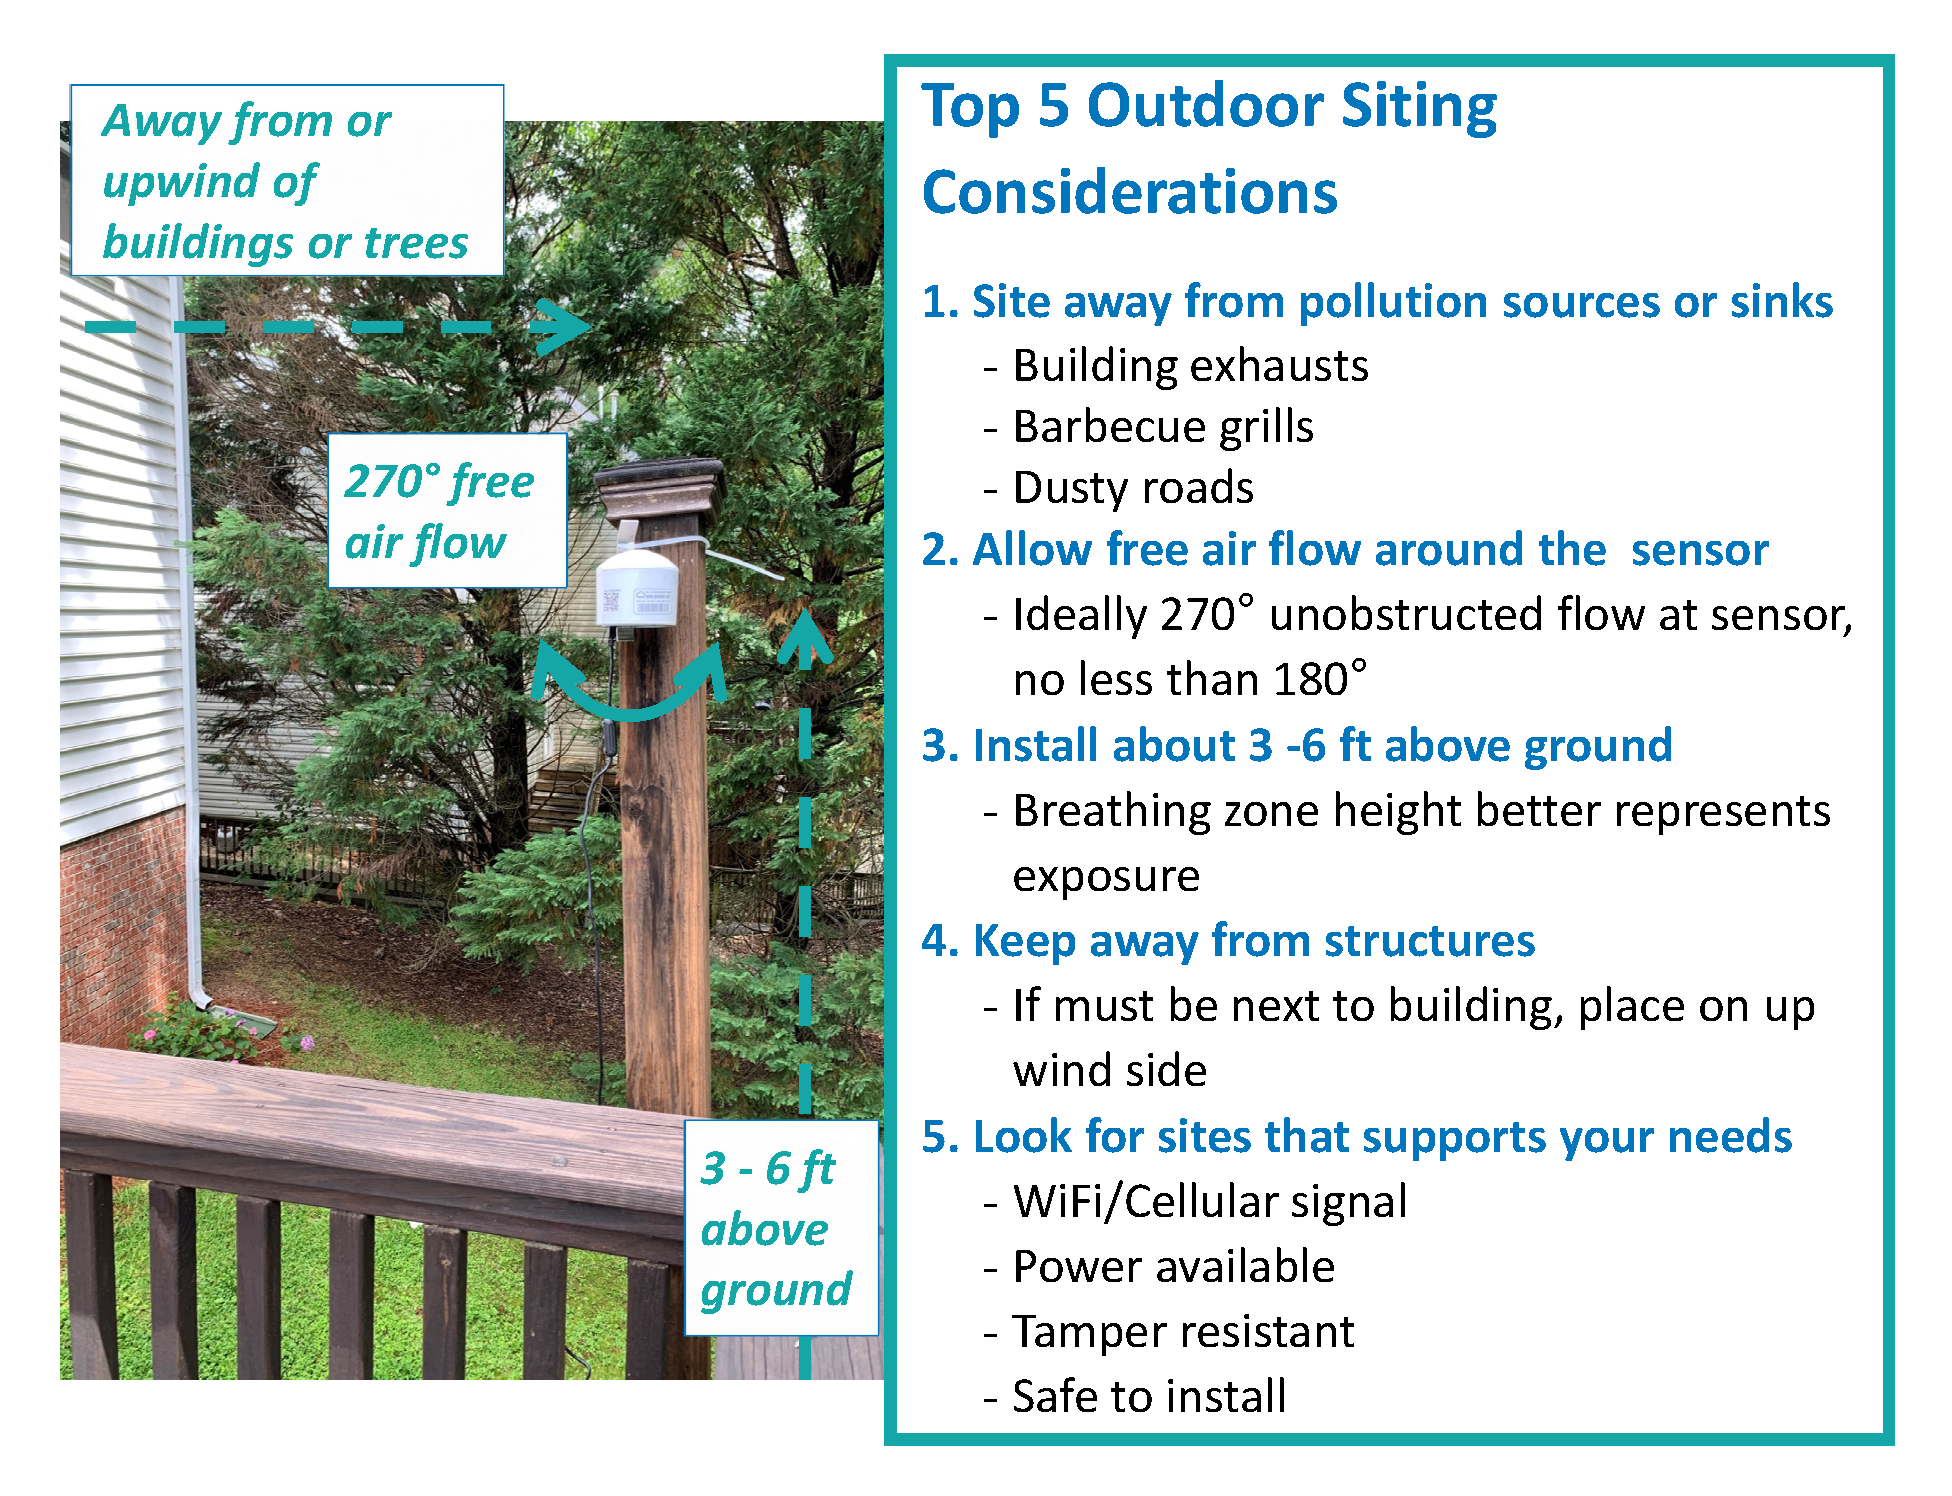
Air sensors operate differently than regulatory monitors (e.g., lower sample flow rates) and are used for different purposes (e.g., informational monitoring), so it is appropriate and sometimes unavoidable, to adjust siting criteria for air sensors rather than strictly following regulatory siting criteria. However, there are some best practices for collecting optimal sensor data for any monitoring goal. Top five considerations for setting up an outdoor sensor are shown below.
Top Five Considerations for Installing Outdoor Air Sensors:
- Site away from pollution sources or sinks: Consider what sources or sinks may be impacting your sensors. Hyperlocal pollution sources may release brief, but high concentrations of pollutants, which may be interesting but can complicate measurement and interpretation of the local air quality conditions. Hyperlocal pollutant sources can include dusty roads, barbecue grills, smoking areas, or building exhausts. Pollutant sinks are localized places where pollutant concentrations are lower because of chemical reactions (e.g., ozone reacting with vegetation) or deposition (e.g., particulate matter being filtered by trees).
- Allow free air flow around the sensor: Sensors need to have free air flow to measure the pollutant. Buildings, fences, trees, plants, and other equipment can prevent the free movement of air and can cause pollutant measurements to be biased or noisy. The sensor’s user guide or manual may describe where air enters and leaves the unit and these openings must not be blocked, even partially.
- Install about 3-6 ft above ground: Often sensor users are interested in understanding a person’s exposure to air pollution and that is best measured by placing the sensor near where a person might breathe. Users may wish to install a sensor at a slightly elevated position (above 6 ft or nearly out-of-reach) to provide additional security or at slightly lower positions to provide easy access. Sensors should be placed at least 3 ft above ground to protect the sensor from splashing water and other ground effects.
- Keep away from structures: As previously mentioned, structures like buildings or fences can prevent free air flow to the sensor. But, for some pollutants, nearby structures may also serve as a sink by reacting with or filtering out the pollutant of interest. Sensors near these structures might report lower pollutant concentrations than in the surrounding area.
- Look for sites that support your needs: The infrastructure needed to mount, power, operate, and secure a sensor will largely depend on the make/model of the sensor and its features. Be sure to consider the power and communication (e.g., WiFi, cellular) needs of the sensor and the distance or range it must be from these services. Finding a site that can fill all of these needs is often cheaper than finding a way to provide them yourself. Security concerns not only include keeping the equipment and data safe but also your physical well-being when installing or checking on equipment.
Evaluating Your Outdoor Sampling Site
After placing your sensor, it’s a good idea to capture and review some data to determine if the site is representative of local area conditions or may be impacted by a hyperlocal source or environmental conditions. Some suggestions include:
- Create and review a time series of data (concentration vs. time) using the highest time resolution possible (no data averaging).
- Does the graph show spikes? This could be indicative of a hyperlocal source like smoking or cooking.
- Are spikes routine? This could be indicative of a cyclic operation like an air conditioning fan turning off and on.
- Are spikes random? Spikes may also be caused by fluctuations in the power supply to the sensor.
- Average the sensor data to hourly or daily averages and compare it to a nearby regulatory station or several other sensors. The AirNow map at www.airnow.gov will show nearby regulatory monitors.
- Do the long-term air pollution trends agree? Some sensors do not report accurate concentrations so, when making this comparison it is more important to identify if the sensor concentration increases and decreases along with the nearby monitors. If not, the sensor may be influenced by a hyperlocal source or nearby structures.
You may wish to relocate your sensor if your data review suggests that any of these scenarios are impacting your measurements. Consider re-visiting this analysis periodically because sites may change over time (e.g., traffic patterns change, trees grow).
Outdoor Collocation With Regulatory Monitors
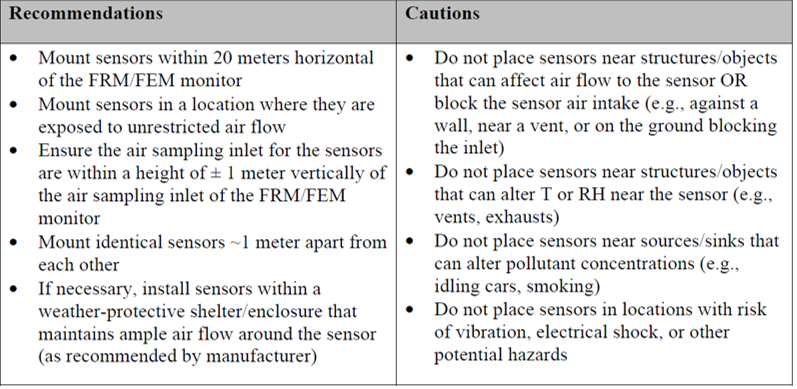
There are situations where more stringent siting criteria should be followed, such as during a collocation. Collocation refers to the process of operating an air sensor with a regulatory grade reference or equivalent monitor (FRM/FEM) at the same time and location under real-world conditions for a defined evaluation period. Collocating air sensors with regulatory monitors can help users evaluate the accuracy of their sensors by comparison of the two data sets. Because the data sets will be compared, it’s important that the devices measure the exact same conditions. Thus, they should be placed close together (within 20 meters or approximately 65 feet of each other outdoors). EPA’s Air Sensor Performance Testing Protocols, Metrics, and Target Values Reports define recommendations and cautions for the siting of sensors when collocated with regulatory instruments.
Recommendations and Cautions for Collocating Air Sensors with Regulatory Monitors
Indoor Sampling Considerations
In many ways, sampling indoors is very similar to sampling outdoors and similar considerations apply. Although, it should be noted that a correction developed from an outdoor collocation may not always apply indoors due to the different nature of indoor air pollution. Also, the approaches to evaluating your outdoor sensor installation by comparing with nearby monitors does not apply to indoor sensors.
Top Five Considerations for Installing Indoor Air Sensors:
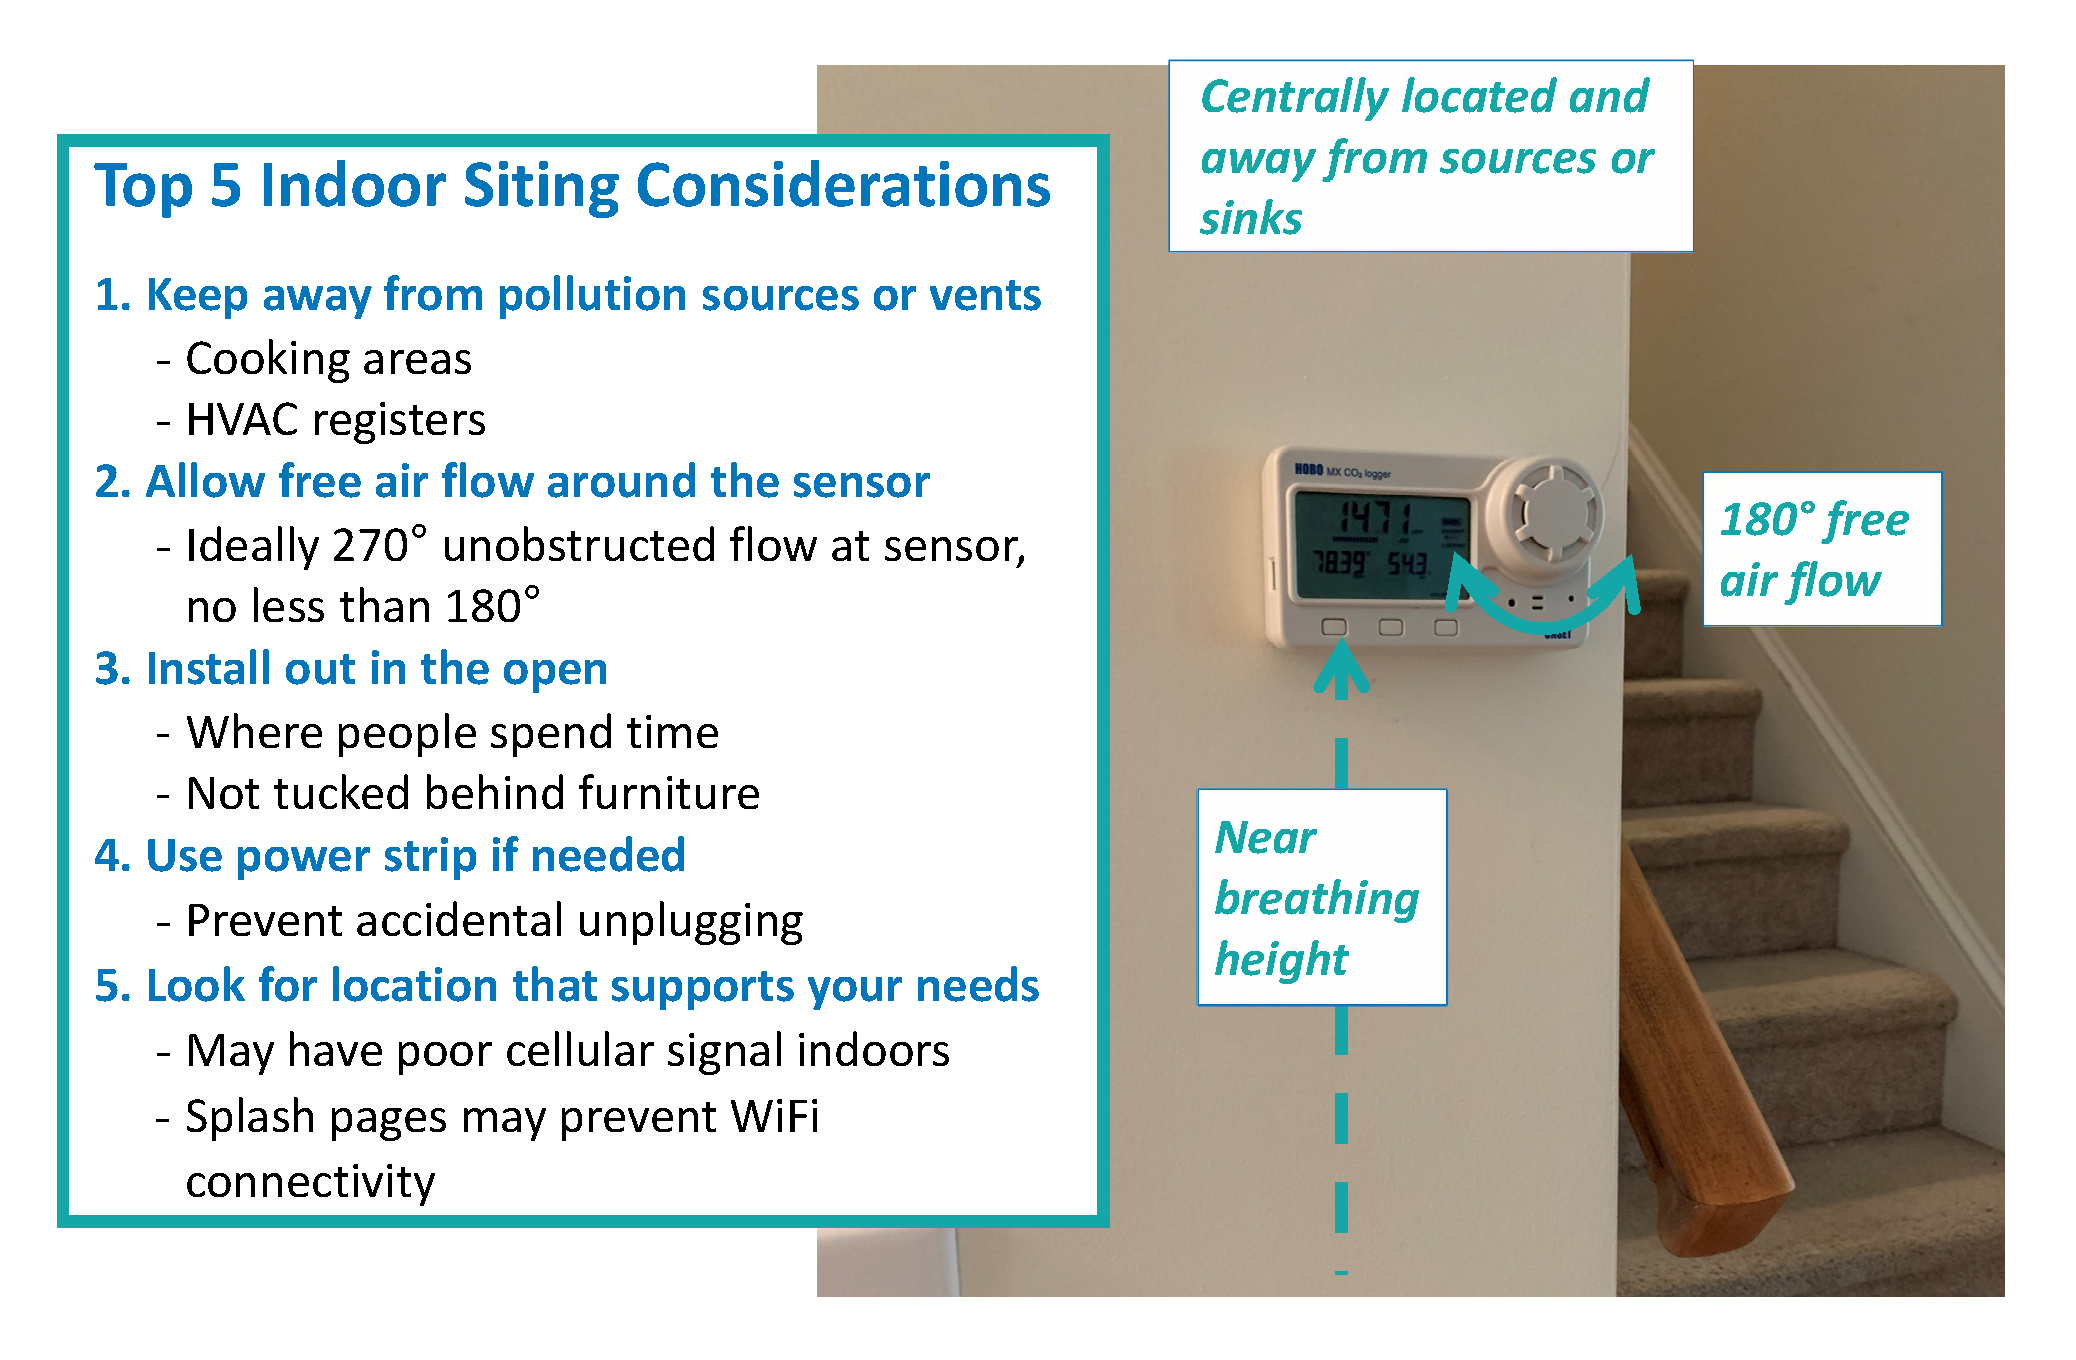
Location: When considering monitoring locations, you may want to consider locations where you or vulnerable or sensitive populations spend time (e.g., homes, medical center, schools, daycares). You may wish to prioritize the most populated or commonly used spaces (e.g., bedroom, living room).
Access: Sensors in public spaces may have restricted access requiring site visits during limited hours or by pre-approved and vetted personnel.
Power: Outlets indoors are often at a premium. Outlets may not be located in ideal locations and power cords can cause trip hazards for people occupying the space. Sensors may be unplugged by people needing the power for other equipment including personal cell phones. Including a power strip with the sensor will allow the outlet to also be used by others.
Communications: Cellular communications indoors may be weaker, which will limit where sensors can be placed. WiFi within public spaces may have authentication splash pages, which may prevent some sensors from connecting to the network. Be sure to consult manufacturers and user guides/manuals during the planning stage to identify potential communication issues.
Security: Placing sensors where they are visible to building personnel will assist them in monitoring operation and in avoiding tampering or theft.
Placement: As with outdoor sensors, it is ideal to place indoor sensors near the typical breathing zone height (3 – 6 ft). Sensors should be placed away from air pollution sources, like a toaster, and air pollution sinks, like air cleaners, to get a more representative measure of indoor air quality. Sensors should have free air flow and not be placed behind furniture or tucked away in corners. Windows, doors, and heating, ventilation, and air conditioning (HVAC) ducts can introduce rapidly changing temperature and relative humidity conditions, which may adversely impact some sensors. Additionally, air quality conditions near doors, windows, and duct inlets or exits may be overly influenced by external sources and not be representative of average indoor concentrations.
Documenting Your Installation
Photos: Photos of the sensor deployment may assist you with data interpretation later. Be sure to photograph nearby features that may impact the sensor readings. Outdoors, this may be nearby buildings, roadways, or landscapes. Indoors, this may be building features like windows, doors, and exhaust vents. These photos should also capture the typical use of an area or room where the sensors are placed. Make sure to have written or verbal consent when taking photos of anyone in the community, especially children.
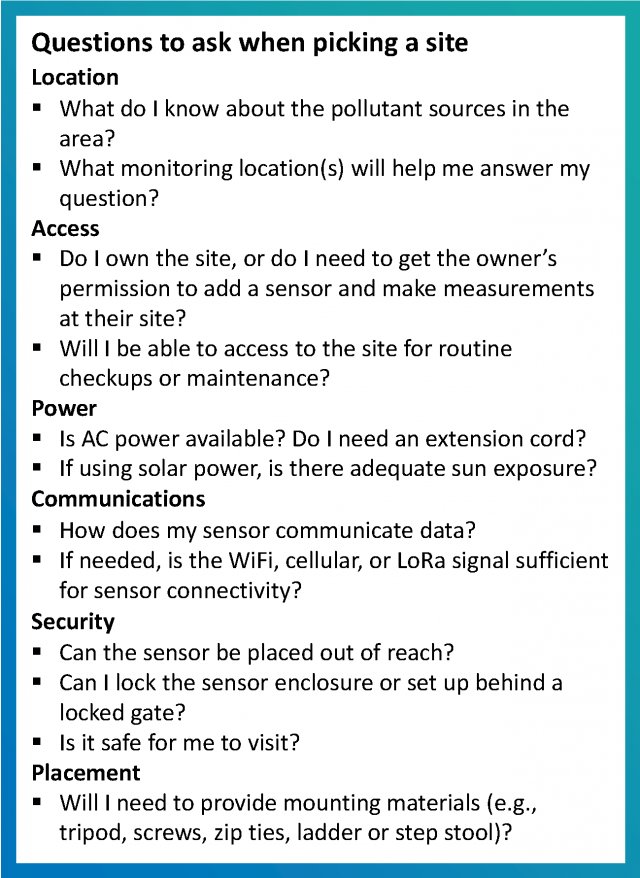
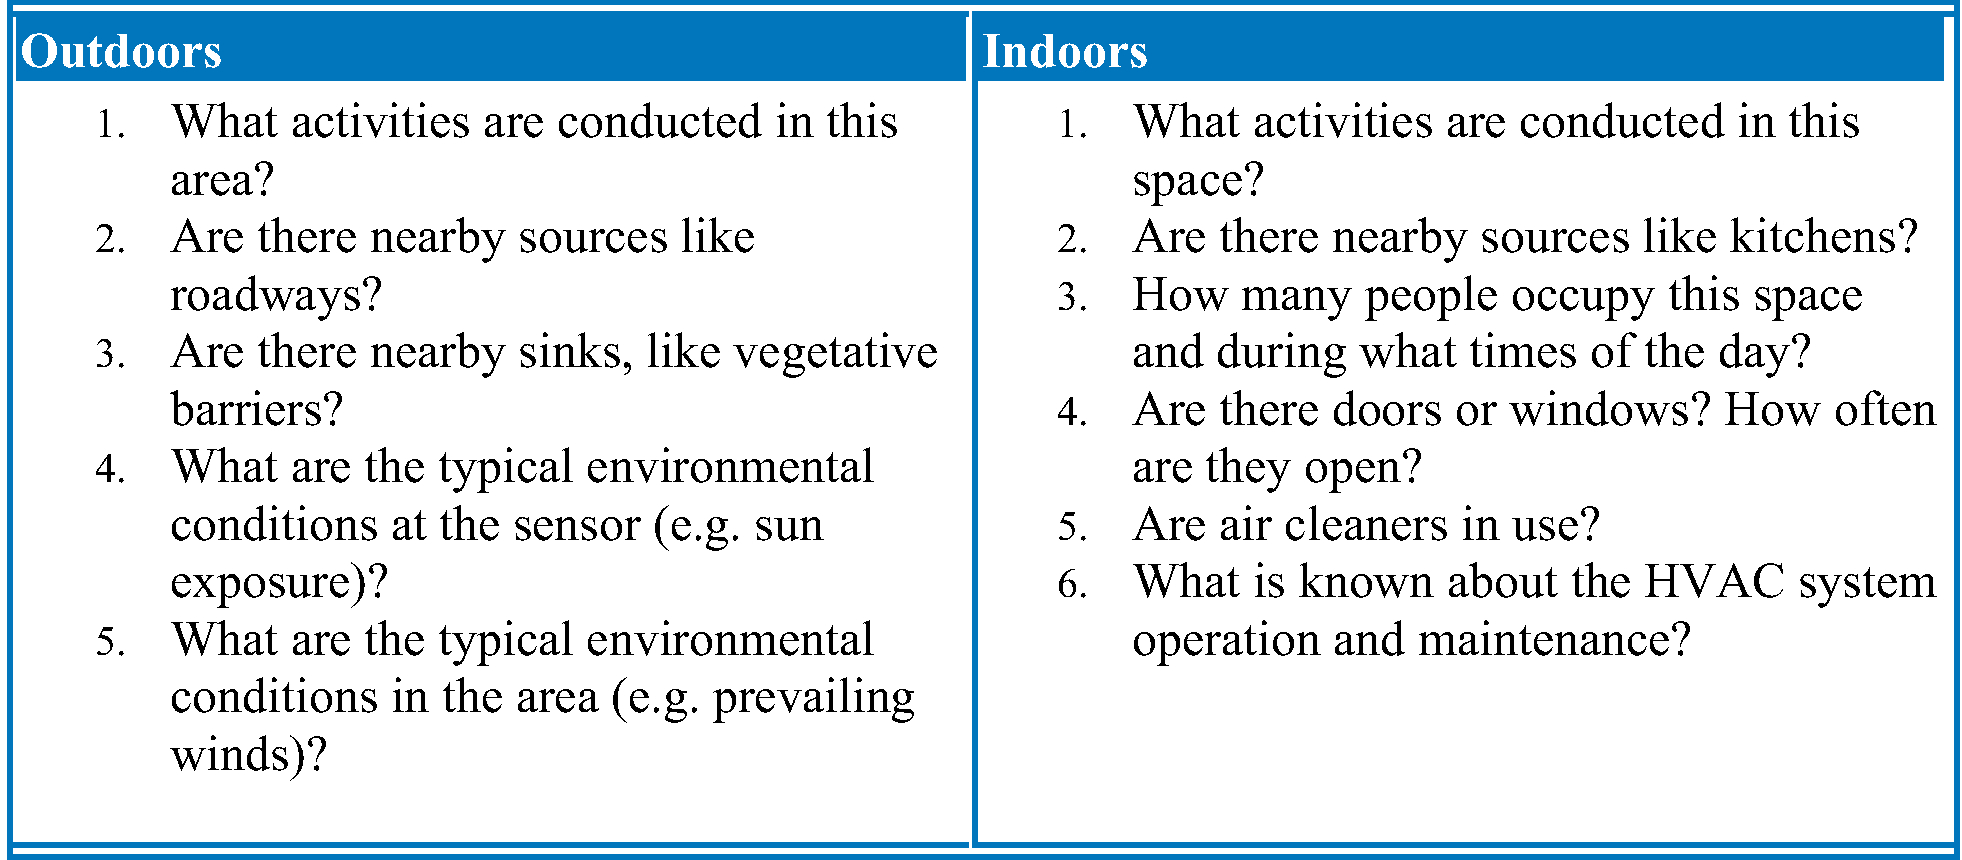
Additional Documentation: In addition to the typical notes recommended to document sensor placement (e.g., location, height, date of installation), you may wish to capture more information about how the area is used. Also consider that temporary activities (e.g., road work, construction activities, cleaning, cooking) may impact the area and confuse data interpretation so keep notes as long as the sensor is in use. The following list of questions provides some guidance about what you might want to document.
Related EPA Resources
- Air Sensor Guidebook
- Performance Testing Protocols, Metrics, and Target Values for Fine Particulate Matter and Ozone Air Sensors
- Collocation Instruction Guide: How to Evaluate Low-Cost Air Sensors by Collocation with Federal Reference Monitors
- Ambient Air Monitoring Quality Assurance Handbook – Chapters 6 and 7
- EPA Indoor Air Quality Website
External Sensor Community Monitoring Resources
- South Coast Air Quality Management Distrct (ACAQMD) Air Quality Sensor Performance Evaluation Center (AQ-SPEC) Sensor Siting and Installation Guide (English and Spanish)
- Tracking California Sensor Community Monitoring Guidebook – Chapter 12
- Air Sensors International Conference Community Monitoring Training
