Test page of EPA Style Guide Pattern Lab
On This Page:
- Pattern Lab Overview
- Styles
- WebCMS Rich Text Editor
- JavaScript Snippets
- Widgets and Other Styling Components
Pattern Lab Overview
What follows is a style guide and pattern library, showing many allowed elements for EPA.gov.
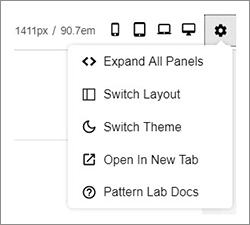
Use the pattern lab settings to customize it's view, located at the top right.

The pattern lab is responsive. Use the icons, located at the top right of the screen, to view how the pattern lab will appear on various devices.

At the top left of the screen you will find the menu with all the elements you can use to stylize your content.

Styles
Components marked with an "*" can also be applied directly to the HTML by selecting the Source button in the WYSIWYG editor. If you can apply the information through the WYSIWYG editor, you should.
In-line Styles
- Abbreviation *
- Adding Definitions *
- Headings *
- Highlighted Headings *
- Horizontal Line *
- iFrame (video) *
- Other Elements
- Italics *
- Strong *
- Small (element) *
- Mark *
- Super/ Subscripts *
- Warning *
- Pull Quote *
Forms
Images / Graphics
Boxes
- Web Standard: Boxes
- About Boxes
- Code change for different box *
- Related Info *
- Highlight *
- News *
- Alert *
- Multipurpose Boxes
- Special One Item *
- No Style (no Box) *
- RSS *
- Blog *
- Box Alignment *
- Clearing Box (and image) Floats
Lists
- Basic list *
- Ordered list *
- Unordered list *
- Clean list *
(no bullets) - Definition list
- Pipeline *
- Tag list
- Underlined list
On This Page
Tables
- All Table Styles
- Accessible tables
- With Borders
- Without Borders
- Sortable Table
- Striped Table
- Unstyled Table
- Datatables (Requires Javascript)
Disclaimers
Grid (Columns)
WebCMS Rich-Text-Editor
Using the Drupal WebCMS editor, you can apply many different styles and formats to your content. Note: many of the styles in the rich-text-editor toolbar are also found in the Pattern Lab.

The WebCMS Editor Quick Reference Sheet provides a description of each of the icons in the rich-text-editor.
Boxes
When you create a box in the WYSIWYG editor it will use the Related Information Box. You can change that to other box types in the code.
Code for default related information box:
<div class="box box--related-info">
Alert box:<div class="box box--alert" role="alert">- Highlight box: <div class="box box--highlight">
- News box: <div class="box box--news">
- Multipurpose box: <div class="box box--multipurpose">
- Special one item box: <div class="box box--special">
To change the default box, you can replace the class to get another type of box. It's allowed. So if you wanted to make a related information box an Alert box, you would replace <div class="box box--related-info"> with <div class="box box--alert" role="alert"> in the code.
JavaScript Snippets
Widgets and Other Styling Components
Clearing Floats
When adding boxes and images that are floated to the left or right, you can add content that “clears” these floated elements by adding one of the following classes:
.u-clear-both,.clear-both{clear:both;}.u-clear-left .clear-left{clear:left;}u-clear-right .clear-right{clear:right;}
Example:
Image, floated right

Duis ut ante est. Suspendisse id tortor augue. Ut mauris dolor, elementum sed faucibus vitae, malesuada nec libero. Sed sed ipsum urna. Duis sed turpis ipsum, vel accumsan eros. Morbi in dolor quam, quis interdum felis. Aliquam commodo leo quis orci mattis eleifend. Lorem ipsum dolor sit amet, consectetur adipiscing elit. Nunc ac leo ac lectus fermentum lobortis. Phasellus dapibus quam id sem congue non aliquet nulla volutpat. Ut ullamcorper nulla nibh. Proin dapibus scelerisque nulla. Nunc pulvinar, odio in malesuada condimentum, libero justo consectetur odio, a volutpat risus orci nec augue. Nam eget tempor dolor. Aliquam in varius elit
Image, floated right, with "u-clear-right"

Lorem ipsum dolor sit amet, consectetur adipiscing elit. Ut imperdiet aliquet sollicitudin. In lectus metus, rhoncus ut volutpat vel, aliquam nec mauris. Donec vestibulum consequat metus, a eleifend dui porttitor at. Nam cursus porttitor cursus. Cras vulputate adipiscing tortor, sed rutrum velit scelerisque non. Etiam iaculis accumsan sodales. Donec dolor eros, consectetur id aliquet quis, imperdiet sed lorem. In eget libero in ante molestie ullamcorper ut nec diam. Cras semper blandit est, id cursus magna porttitor quis. Vivamus quis dui eu purus ullamcorper adipiscing. Suspendisse rhoncus condimentum bibendum. Suspendisse vulputate neque quis tortor ornare elementum. Integer fringilla consectetur nunc, a mollis risus adipiscing vitae. Nulla varius egestas bibendum. Maecenas orci ipsum, feugiat nec posuere eu, facilisis malesuada mi.
How to:
- First, add your content. Then add your floated images (or boxes, etc.).
- Select the Source code button in the WYSIWYG editor toolbar and in the source code, add the appropriate class to the <p> or <div> you want to clear.
- Match your clear to your float. If you float right, then clear right.
- Image code example:
<p class="u-clear-right">
